Tag Archives: embroidery

Quilt and Stitch … Some ideas, Part 8

Continuing with the series (my previous Quilt and Stitch posts: One, Two, Three, Four, Five, Six and Seven).

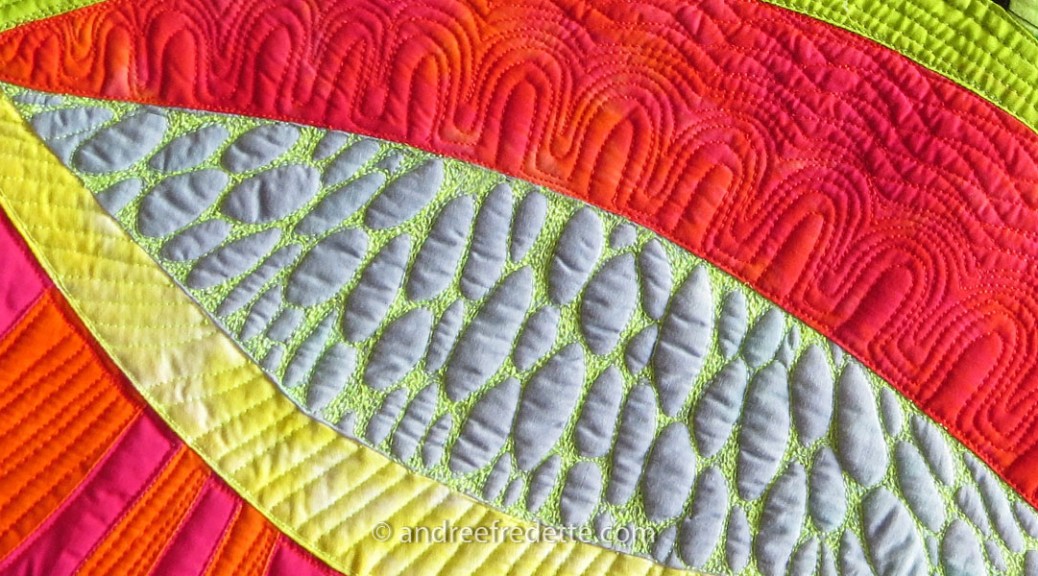
Here is a look at Jungle, a quilt I made two years ago. I like to think of my motifs as “graffiti” quilting, because they flow out of my brain without too much thought and planning. I don’t do a lot of marking ahead of time. If any.

Quilting bubbles, the start. Photo by Andrée Fredette

It is obvious that I get my ideas from the green world out there, and the bubbles are a form of cells. Above, I began by outlining the bubbles with a first go-round. Then – as shown on the featured photo at the top of this post – I “really put some thread into it”, to make the blue fabric bubbles really stand out from all the contrasting stitching.

Problem solving for a quilt in progress. Photo by Andrée FredettePutting a lot of thread work in some bits, next to loosely quilted areas, can create issues. The piece will not lie flat. Since I consider my work to be two-dimensional, I have to solve that problem. Above, one solution is to create a “dart”. Breathe deeply and… cut. Then sew again, and re-stitch the affected area. Works like a charm. It is just a bit scary the first time you attempt it…

This is an exuberant quilt, with wild colours. So is nature, by the way… Below, an example from my deck, a succulent (forgot the name) that spends the summer outside, in the sun. In winter, this plant is green, mostly. But right now, it is very happy in the sun:

Summer heat colours a succulent with joy. Photo by Andrée Fredette

Back to the quilting. Deciding on a texturing approach for different areas of the quilt is tricky. Sometimes, I go with straight lines, sometimes, curvy-curly. Here are two “neighbourhoods” with contrasting solutions:

Quilt lines, dense or light. Photo by Andrée Fredette

And as an afterthought, I added some thick and exxagerated stitching lines on the right, to echo the pieced ridges on the left.

Another quilting idea comes from “pointy bits”, a tree I noticed at the Butchart Gardens. Here is a close-up photo:

Detail of exotic tree at Butchart Gardens. Photo by Andrée Fredette

Pointy Bits served as inspiration for the pointy quilting lines below. As usual, I did not try to concoct an exact representation of that leaf pattern. That pattern was just a starting point for me.

Prickly Quilting Lines

Continuing with other areas of the piece, there were more leaf areas to texture, so I chose the obvious, wavy lines that evoke leaf veins…

Quilted Leaf Lines. Photo by Andrée Fredette

There are soooo many ways to interpret leaf lines. As many as there are leaves, really. Here is a manipulated photo of hostas, in their full glory:

Hosta Leaves. Photo by Andrée FredetteAren’t they just luscious? Summer’s late afternoon sunshine, reaching for these shade-loving plants. They are basking in the light. Those lines are lovely…

And here, in another section of the same quilt, a motif that has been following me around for at least a decade: the leaf, shield, whatever it suggests to you… Surrounded by repeat lines, and straight ones that wander.

Curvy Quilting Lines, Quilt and photo by Andrée Fredette

And as a finish, here is close-up photo of crocosmia blooms, with a touch of digital manipulation. I just wanted to finish on a note of orange…
Crocosmia blooms, photo by Andrée Fredette


Quilt and Stitch… Some Ideas, Part 7

Traveling back in time, on this 7th of my posts exploring the origin of the species some of the techniques I use to texture and quilt my work.

(My previous Quilt and Stitch posts are here: One, Two, Three, Four, Five, and Six).

Sinuous Fern Lines. Photo © Andrée Fredete

First, here is a photo of a sword fern frond, its sinuous lines highlighted with bright colours, lacy edges and all.  It’s an introduction to the sinuous lines of a quilt I made long ago, celebrating my son’s birth, and my memories of the hours that preceded his arrival.

During those hours, I was hooked to a monitor that kept track of my contractions, with a very wavy set of lines, a visual description of what my body was going through.

A few years later, while paging through a photo album, I came across the monitor printout. Memories of that day just flooded in.  I thought I could interpret those lines in a quilt. In hot colours.

Here is Contractions:Contractions. Quilt by Andrée Fredette

First, I inserted wavy lines into a black piece of cloth, using reverse appliqué.

Contractions, Detail. Photo by Andrée Fredette

I used bright colours to highlight the electric waves of contractions I remembered so vividly…

And about bright colours: I think that any rules you were taught (or read about) are meant to be broken, at least a few times.

To illustrate that, here is a close-up of a Rufous hummingbird.

Colourful nature! Rufous Hummingbird. Photo © Andrée Fredette

Who knew that hot pink can be jazzy near this delicate buff, and russet? And that the heat of that hot colour actually brings out the subtle green below? Not me.

In nature, almost anything goes, so why not in textile art?

Back to stitching: after inserting the bright reverse-appliqué lines and shapes , I moved on to the finishing of raw edges. Lots of plain old satin stitching. Let me tell you that satin stitching along miles (or so it seemed) of curvy lines got a tad repetitive.

I started playing with the thread colours and the tension in my machine. I used two thread colours in the top, and a third in the bobbin. I added extra tension on top, to “pop” the bottom thread.

Contractions, Detail 2 Quilt and photo by Andrée Fredette
In a way, this approach is the equivalent of creating your own variegated thread. All three colours show up and blend. The above photo shows the progression from plain satin stitch on the left and middle, to jazzy “bubble stitch” with three threads on the right.

Between the wavy inserts, I added more texturing. I was hoping to create flow between the rows of contractions.

Contractions, Detail 4. Photo by Andrée Fredette

Above, the left blue and red curvy shape is entirely thread-play. The right reverse-appliqué in red is edged with moss stitch. This is very tight figure eight stitching. Very time consuming. And thread consuming too…

Contractions, Detail 3. Quilt by Andrée Fredette

Above, on the left: regular satin stitching with two thread colours and with really tight top tension, pulling up the bobbin thread to the surface, and creating an interesting variation in the process. A “tribal” effect. I really like it.

On the right: satin stitch with spikes, in purple. The spikes were achieved by jerking the piece at some points, to break up the regular sating stitching.

Thread play. It’s fun, it’s not dangerous. It can keep you out of trouble. Well, you may end up investing in threads… So it could be dangerous, after all.

Sea star with special effects. Photo © Andrée Fredette

In closing, I offer up a  sea star, gloriously red and ridged, hanging out on the side of a rock. Colour and texture, always a winning combo.

Quilt and Stitch… Some Ideas, Part 6

More on my sources of inspiration. (My previous Quilt and Stitch posts are here: One, Two, Three, Four and Five.)

I look for lines and it’s very easy to find them everywhere.

Growth lines, saw marks in hardwood. Photo by Andrée Fredette

I like lines that curve and repeat, obviously…

Quilting detail, back of quilt. Quilting and photo by Andrée Fredette

I think nature is right up there with the Goddess, the Boss, the One in Charge. I don’t even try to reproduce exactly what I see because, frankly, I don’t think I could do it justice. I am happy to just interpret what I see.

Beetle tracks, below the bark. Photo by Andrée Fredette

Above: beetle tunnels under the bark, revealed once the tree is dead and has fallen on the ground.

And now, I take you on a side trip to visit the culprit (probable culprit…), of those “mines” as they are called on the fact sheet from Natural Resources Canada, the Golden buprestid (Buprestis aurulenta Linnaeus). A true jewel, don’t you think?

Golden buprestid (Buprestis aurulenta Linnaeus), a common wood-boring beetle of the BC coast. Photo by Andrée Fredette

Well, it’s a jewel when it emerges, but its larvae mine channels through wood, even after it’s been milled, sometimes after many years. The record is 60 years, apparently. How about this piece of jewelry emerging from one of your baseboards?

And on the West Coast of BC, the water’s edge is rich with lines and texture. Another of my image hunting grounds.

Inspiration lines from kelp. Photo by Andrée Fredet

Above, kelp at low tide, at Botanical Beach, on the west coast of Vancouver Island.  Which can be interpreted this way, with some fairly dense threadwork…

Detail of thread work. Quilt and photo by Andrée Fredette

Here is another abstract photo of kelp at low tide, drying in the sun and waiting the returning waters. I love that gleam.

Kelp at low tide, almost abstract. Photo by Andrée Fredette

Machine play that evokes water, flow. Water here, water gone.

Under the Ice, detail of quilt. Quilting and photo by Andrée Fredette

And when water plays with rocks, it’s a powerful creator of shapes. Here is an example from the Sooke Potholes Provincial Park on Vancouver Island, where the Sooke River offers a series of waterfalls, calm water and rapids.

Smooth rocks shaped by water at the Sooke Pot Holes, Vancouver Island. Photo by Andrée Fredette

And I leave you with these smooth rocks. May the stitching and texturing go as smoothly.

Quilt and Stitch… Some ideas, Part 4

If you have read the preceding parts of this series (Quilt and Stitch posts: One, Two and Three), you know that I get my ideas from nature. A leaf pattern, a stem, wave action, water… And in this case, water, definitely.
IMG_0403

Above, this is another example of my little “corridors” or lanes, first drawn with a straight stitch (well, meandering, but straight, if you get my drift…), and then filled with a motif. I chose the curl to hint at flow, eddies of water. In this case, a piece about the desert in Australia, absent water…

Machine embroidery and quilting. Photo © Andrée Fredette

It usually takes me a long time of staring at a quilt top before making a decision on exactly how I will go about texturing it.  Sometimes, I will put the finished quilt top away for weeks, before bringing it out, hanging it on my work wall and taking a fresh look at it. In other cases, I know how I will proceed even before finishing the top.

In earlier examples from Quilt and Stitch Ideas, I showed examples of how some quilts “tell me” that the quilting lines or motifs should remain within colour boundaries,  within the lines.

But other quilts call for lines that flow across the whole piece. I carry the lines across those boundaries, because it feels right.

Machine embroidery and quilting. Photo © Andrée Fredette

This last image shows how much fun it is to compose patterns intuitively. Looks like critters coming out of the ocean, doesn’t it?

Quilt and Stitch… Some Ideas, Part 3

Here is the third part of my little series (Quilt and Stitch posts One, and Two) on how I approach the quilting or texturing (or embroidery) of a quilt.

Once I create a top, or quilt surface, I spend a lot of time staring at it, trying to decide how I will add the layer of texture. Where will the lines be most effective? Does it need a lot of texture? Or restraint?
Stitiching-quilting sample. Photo copyright Andrée Fredette

Those are hard decisions. It is sooooo easy to go overboard.

Machine embroidery and quilting. Photo © Andrée Fredette

Most of the time, I follow the pieced lines (where two colours meet, for example), and texture between the lines. But there are always exceptions. Rules that need breaking…

IMG_0369

And then, there is just the simple joy of meandering on a single piece of fabric, while changing thread colours. I have made discoveries that way! A line of black, for example (on the left, above), serves to highlight its light-coloured neighbour. Relief, in a way… On the right, above, I first placed a little pair of meandering lines in regular thread. Then I turned the piece over, and filled-in that little corridor with a “mossy stitch”, which is a tight figure-eight stitch, using a thick thread wound in my machine bobbin. Time consuming, but very zen.

Machine embroidery and quilting. Photo © Andrée Fredette

Finally, another little “sketch”, a practice piece where I tried out various ideas… You can see the evolution of lines, with their accessory and filler motifs.